Building a CRUD API with FastAPI and Supabase: A Step-by-Step Guide
Learn how to quickly build a powerful CRUD API with FastAPI and Supabase
Keshav is an avid Infosec enthusiast and passionate about quirky things. He loves to build and break stuff just to know how it works. Currently working in the security industry, he uses his knowledge to build secure products but also makes tools to help the community. He likes to write blogs related to security and software development.
Are you looking for a way to quickly and easily create a CRUD API? If so, then using FastAPI along with Supabase is the perfect solution. With this step-by-step guide, you’ll learn how easy it is to build an API that can handle all of your data needs.
You’ll be able to add and query data from your database, and even update or delete records. All of this can be done in just a few simple steps! So if you’re ready to get started creating your own powerful CRUD API with FastAPI and Supabase, read on!
What is Supabase?
Supabase is an open-source Firebase alternative. It provides the same functionality and architecture as Firebase, but with a focus on Postgres databases instead of NoSQL storage.
Supabase provides a number of features including real-time streaming, authentication, storage, and more. It's designed to be easy to use for developers who are familiar with SQL databases such as Postgres or MySQL. With Supabase, you can quickly and easily set up a CRUD API (and much more) that can handle all your data needs.
What is FastAPI?
FastAPI is an open-source web framework built on top of Python's highly popular asynchronous web framework, Starlette. It is designed to help developers create high-performance, reliable, and secure APIs quickly and easily.
FastAPI makes use of industry-standard tools such as OpenAPI and JSON Schema, ensuring that all APIs created using it are fully compatible with existing APIs used by other applications. Its architecture is also specifically designed for scalability so that developers can easily scale their projects as their user base grows.
Setting up Supabase Project
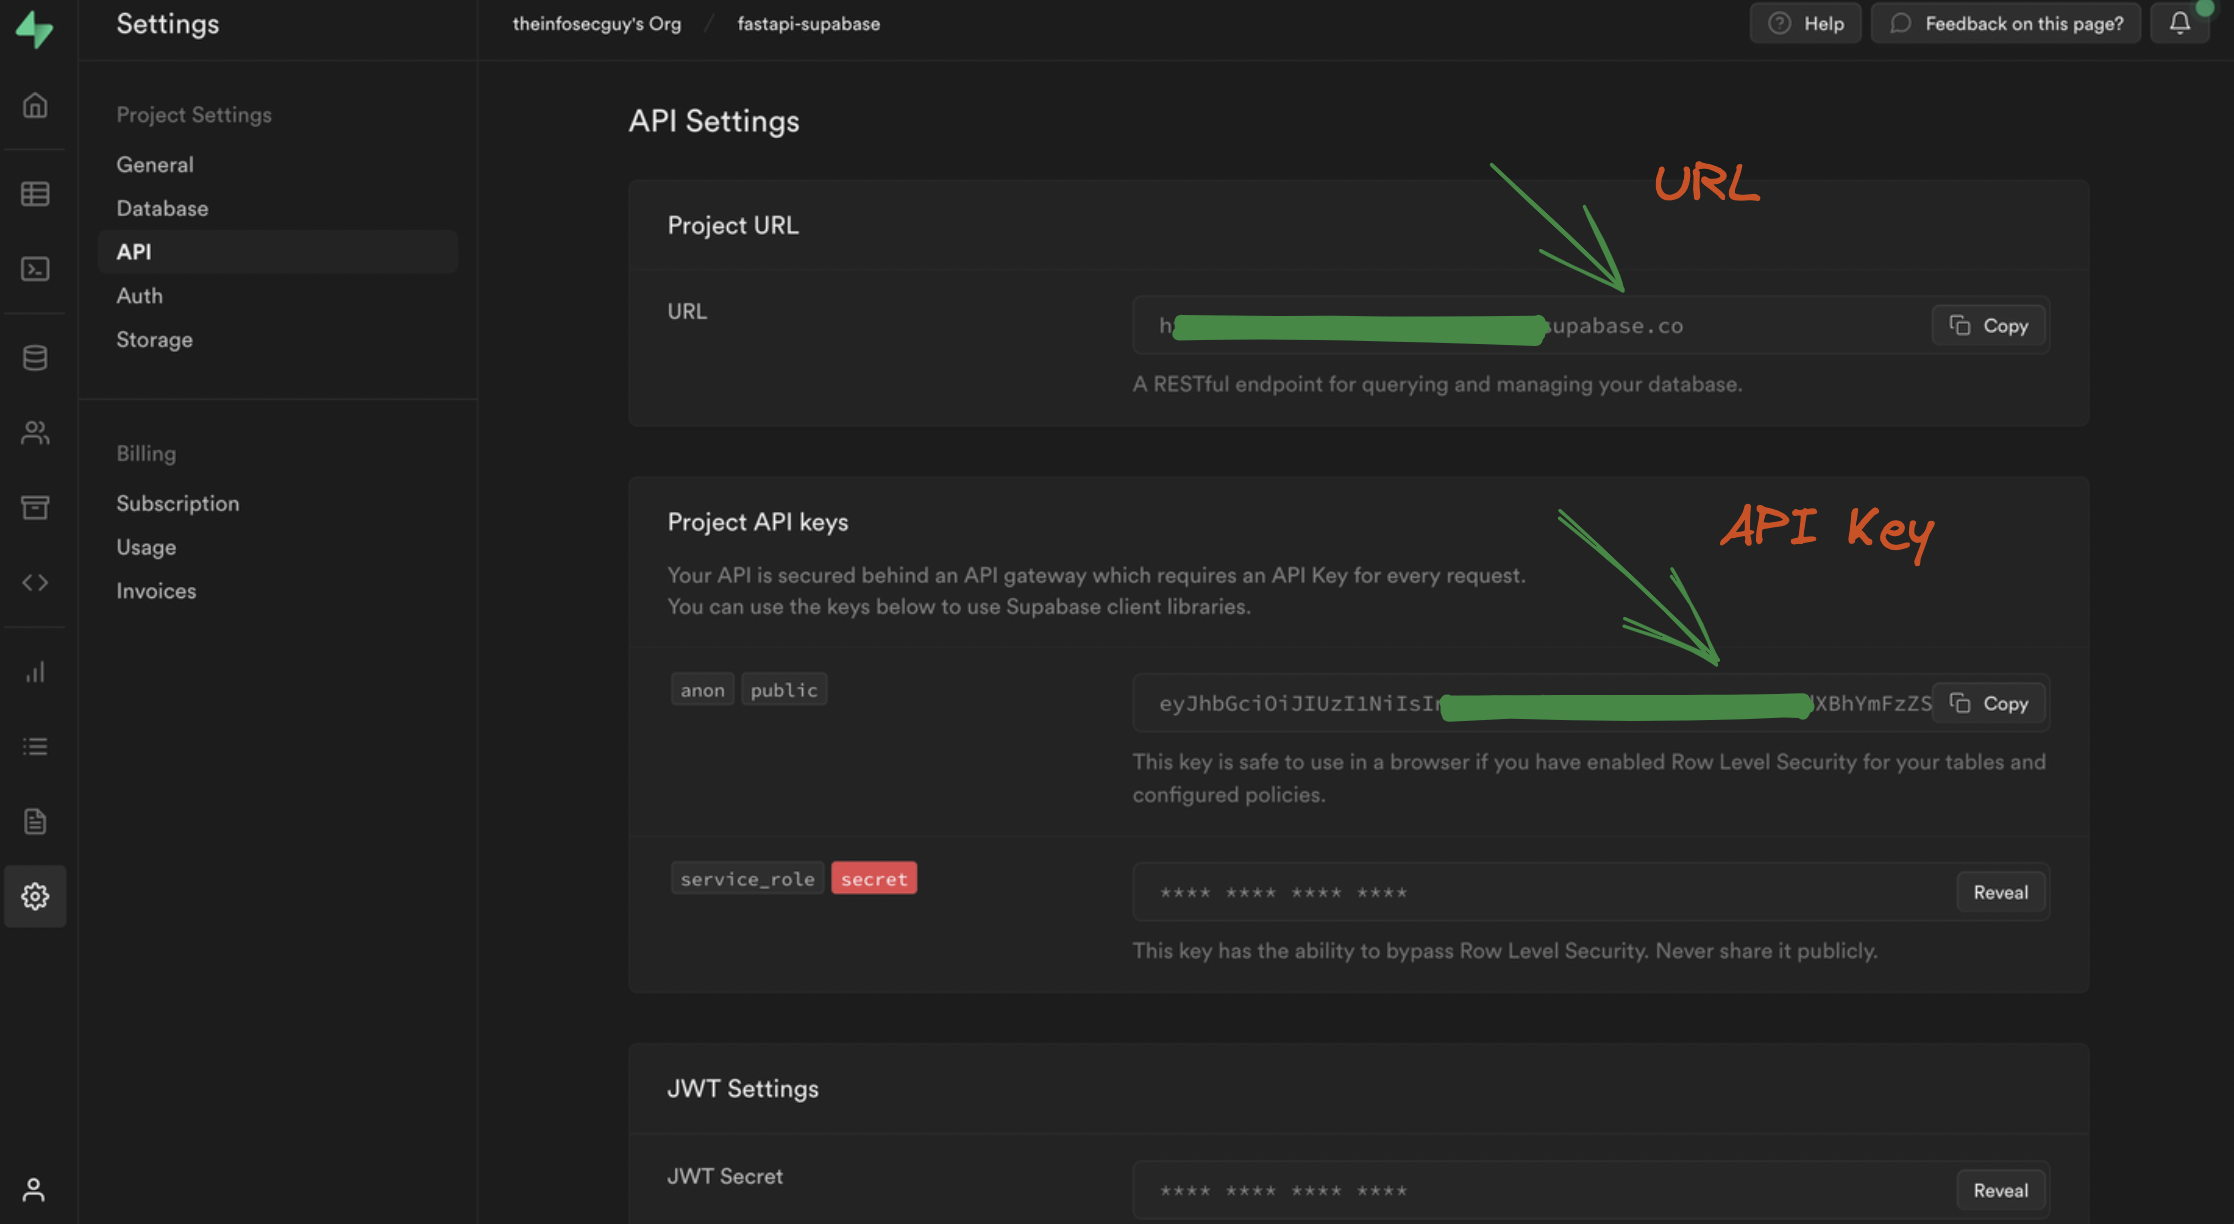
To integrate Supabase with Python, we need Supabase URL & API Key. We can get these directly from Supabse. First, create a project in Supabase from the Supabase dashboard.
Once the project is up, navigate to Project Setting < API and copy the URL & API Key.
After copying the URL & Key, navigate to the Tables tab and create users table and add 3 columns: name , email , and password .

Integrating FastAPI with Supabase
Before we integrate FastAPI with Supabase, let's first create a virtual environment and install the required dependencies.
mkdir fastapi-supabase; cd fastapi-supabase
pipenv shell
pip install "fastapi[all]" bcrypt supabase
🚨Note: If you don't have pipenv installed, you can install it using the sudo apt install pipenv command.
Once all dependencies are installed, create a config.py file to store secrets. Although storing secrets in plain text is never recommended, for the sake of ease of this tutorial, let's add the secrets in the config file.
url="https://abc.supabase.co"
api="dummy-api"
💡Learn more: How to Handle Secrets in Python
Now, let's create a FastAPI application. First, create an app directory containing the main.py file and paste the following code.
from fastapi import FastAPI

app = FastAPI()

app.get("/")(lambda: {"Hello": "World"})
This is a bare-minimum FastAPI application running on http://127.0.0.1:8000/ and returning {"Hello": "World"} on / route. Start the server using the command:
uvicorn app.main:app --reload
FastAPI Supabase Connection
We have successfully created the Supabase project and FastAPI application. Now let's connect to Supabase. Create a db directory and add a supabase.py file with the following code. Also, add __init__.py file in the db directory.
from supabase import Client, create_client
from config import api, url

api_url: str = url
key: str = api

def create_supabase_client():
    supabase: Client = create_client(url, key)
    return supabase
We can now import create_supabase_client function in our main.py file to connect to Supabase.
CRUD API using Supabase & FastAPI
We have successfully connected to Supabase. Now, let's create a route to add data in the table but before we do that, let's first create a Pydantic BaseModel which we will use to validate the request body. Create a models.py file in the app directory and add the following code.
from pydantic import BaseModel

class User(BaseModel):
    name: str
    email: str
    password: str
Now, let's add the first route in the main.py file to add data to the users table.
import bcrypt
from fastapi import FastAPI
from app.models import User
from db.supabase import create_supabase_client

app = FastAPI()

# Initialize supabase client
supabase = create_supabase_client()

def user_exists(key: str = "email", value: str = None):
    user = supabase.from_("users").select("*").eq(key, value).execute()
    return len(user.data) > 0

# Create a new user
@app.post("/user")
def create_user(user: User):
    try:
        # Convert email to lowercase
        user_email = user.email.lower()
        # Hash password
        hased_password = bcrypt.hashpw(user.password, bcrypt.gensalt())

        # Check if user already exists
        if user_exists(value=user_email):
            return {"message": "User already exists"}

        # Add user to users table
        user = supabase.from_("users")\
            .insert({"name": user.name, "email": user_email, "password": hased_password})\
            .execute()

        # Check if user was added
        if user:
            return {"message": "User created successfully"}
        else:
            return {"message": "User creation failed"}
    except Exception as e:
        print("Error: ", e)
        return {"message": "User creation failed"}
In the above code, we have /user POST route to add data to the table by using insert function from supabase . We are also using user_exists function to check if the user exists in the table or not. Additionally, we are using hashpw function to hash the password before storing the password in DB (NEVER store plain text passwords in DB).
Now, let's test it out using curl . You can also use the Swagger UI or any other API testing tools (such as Postman).
curl -X POST -H "Content-Type: application/json" -d '{"name": "John Doe", "email": "john.doe@example.com", "password": "password123"}' http://127.0.0.1:8000/user
🚨Note: Swagger UI can be accessed by visiting the /docs or /redoc environment.
If you have followed all steps properly, you will receive the following response.
{"message":"User created successfully"}
Let's now quickly update the main.py file to add functions to perform READ, UPDATE, and DELETE operations.
from typing import Union

import bcrypt
from fastapi import FastAPI
from app.models import User
from db.supabase import create_supabase_client

app = FastAPI()

# Initialize supabase client
supabase = create_supabase_client()

def user_exists(key: str = "email", value: str = None):
    user = supabase.from_("users").select("*").eq(key, value).execute()
    return len(user.data) > 0

# Create a new user
@app.post("/user")
def create_user(user: User):
    try:
        # Convert email to lowercase
        user_email = user.email.lower()
        # Hash password
        hased_password = bcrypt.hashpw(user.password, bcrypt.gensalt())

        # Check if user already exists
        if user_exists(value=user_email):
            return {"message": "User already exists"}

        # Add user to users table
        user = supabase.from_("users")\
            .insert({"name": user.name, "email": user_email, "password": hased_password})\
            .execute()

        # Check if user was added
        if user:
            return {"message": "User created successfully"}
        else:
            return {"message": "User creation failed"}
    except Exception as e:
        print("Error: ", e)
        return {"message": "User creation failed"}


# Retrieve a user
@app.get("/user")
def get_user(user_id: Union[str, None] = None):
    try:
        if user_id:
            user = supabase.from_("users")\
                .select("id", "name", "email")\
                .eq("id", user_id)\
                .execute()

            if user:
                return user
        else:
            users = supabase.from_("users")\
                .select("id", "email", "name")\
                .execute()
            if users:
                return users
    except Exception as e:
        print(f"Error: {e}")
        return {"message": "User not found"}


# Update a user
@app.put("/user")
def update_user(user_id: str, email: str, name: str):
    try:
        user_email = email.lower()

        # Check if user exists
        if user_exists("id", user_id):
            # Check if email already exists
            email_exists = supabase.from_("users")\
                .select("*").eq("email", user_email)\
                .execute()
            if len(email_exists.data) > 0:
                return {"message": "Email already exists"}

            # Update user
            user = supabase.from_("users")\
                .update({"name": name, "email": user_email})\
                .eq("id", user_id).execute()
            if user:
                return {"message": "User updated successfully"}
        else:
            return {"message": "User update failed"}
    except Exception as e:
        print(f"Error: {e}")
        return {"message": "User update failed"}

# Delete a user
@app.delete("/user")
def delete_user(user_id: str):
    try:
        # Check if user exists
        if user_exists("id", user_id):
            # Delete user
            supabase.from_("users")\
                .delete().eq("id", user_id)\
                .execute()
            return {"message": "User deleted successfully"}

        else:
            return {"message": "User deletion failed"}
    except Exception as e:
        print(f"Error: {e}")
        return {"message": "User deletion failed"}
We have added functions to perform CRUD operations on users table. We have used GET to get user (or list of users) information, POST to add information to the table, PUT to update name and email and DELETE to delete data from the table.
In the update_user function, we are receiving user_id , name and email from the client and checking if the user (with user_id) exists in DB or not. If yes, we update the name and email in the table.
curl -X PUT "http://127.0.0.1:8000/user?user_id=5&email=test@gmail.com&name=hello"
In the get_user function, we receive user_id as a query parameter. In this case, user_id is optional. If user_id is present, we respond back with user details (without password) otherwise we send back a list of users from the users table.
curl http://127.0.0.1:8000/user
The delete_user simply checks if the user with user_id from query parameter is present in the table or not. If it's present, it deletes the user.
curl -X DELETE "http://127.0.0.1:8000/user?user_id=5"
🚨Note: This is just a basic tutorial for an explanation. Please thoroughly test your application before moving your application to production! 🚀
Link to Code
Here's the GitHub repository with the complete code.
Conclusion
In this blog, we discussed how developers can use FastAPI and Supabase to quickly build a powerful CRUD API. With the step-by-step guide provided, developers will be able to leverage the power of both platforms to query data from their database and even update or delete records with ease.
Furthermore, all APIs created using FastAPI are fully compatible with existing APIs used by other applications due to their use of industry-standard tools like OpenAPI and JSON Schema. So if you're looking for an efficient way to create your own RESTful API then give FastAPI & Supabase a try today!
If you have any questions, feel free to send me an email 📧.
Thank you for reading! 🎉👨💻